
 Kendric adan
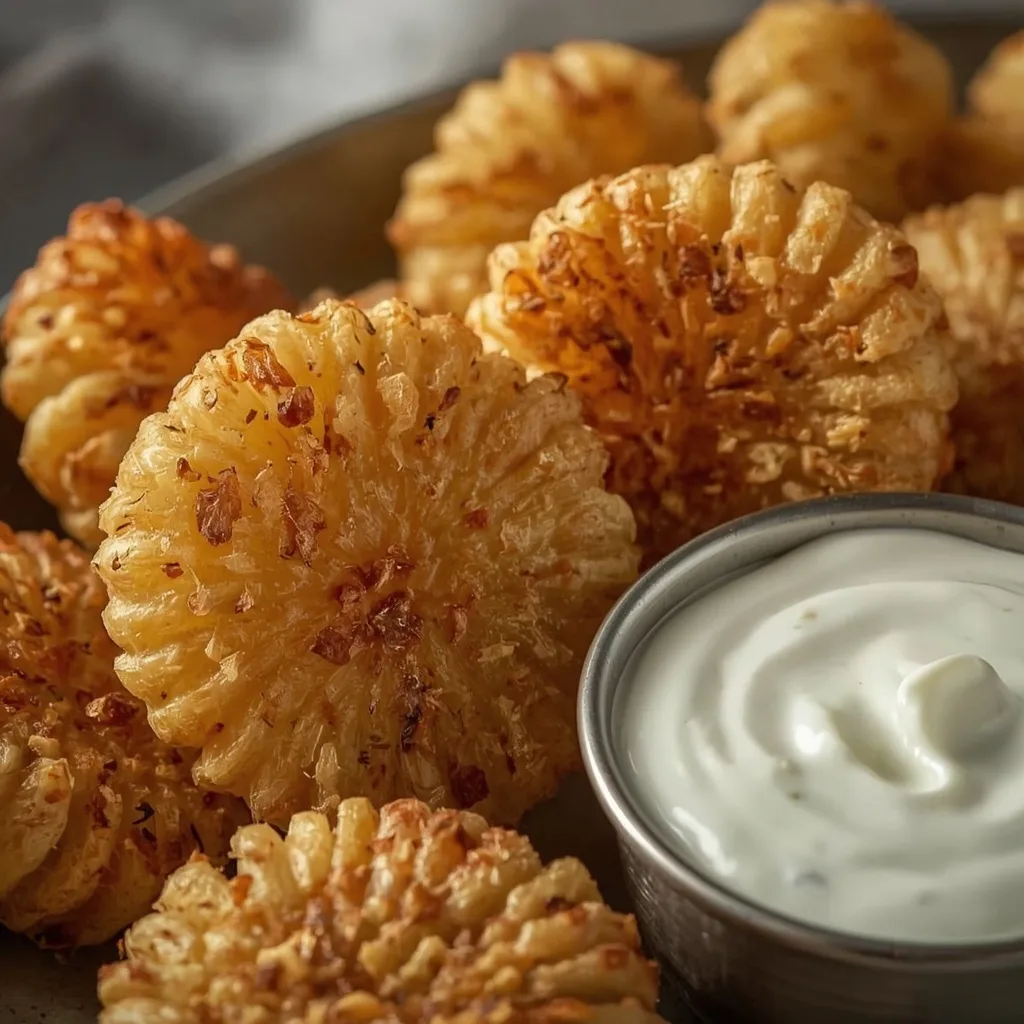
 Boston Pizza Cactus Cut Potatoes are thick, crunchy-edged potato wedges with a fluffy interior and a bold, savory-spicy seasoning that keeps you reaching for one more. This copycat version delivers everything you love about that appetizer without the deep fryer or the drive.
The whole process takes about 55 minutes from start to finish, and it is beginner-friendly — the only tricky part is getting the wedges completely dry before baking. A hot oven and a simple soak do all the heavy lifting here, so you end up with restaurant-quality results on your first try.
Why You’ll Love This Recipe
- Real crunch without deep frying — Baking on a wire rack at 425°F gives you the same crispy shell as a fryer but with far less oil.
- The seasoning hits every note — Smoky paprika, sharp garlic, and a whisper of cayenne create that addictive, savory-spicy profile the original is known for.
- Simple ingredients, big payoff — Russet potatoes, a handful of pantry spices, and a quick ranch-style dip come together with no special equipment.
- Perfect for game day or a side dish — These wedges hold up well under dips and sauces and stay crisp long enough to share.
What Makes This Recipe Special
The shape and the soak are what set these wedges apart from standard oven fries. Cutting the potatoes into 1/2-inch thick wedges creates more surface area for browning, while a 10-minute cold water soak removes excess starch so the outsides get deeply crisp instead of steaming. The result is a wedge that snaps when you bite into it, then gives way to a soft, fluffy center. The homemade ranch dip, made with sour cream, buttermilk, and dried dill, cools the heat from the cayenne and completes the experience.
Ingredients You’ll Need
For the Potatoes
- 3 large russet potatoes (about 2.5 pounds) — Russets have the right starch content for fluffy interiors and crisp exteriors. Scrub them well but leave the skin on for texture and nutrients.
- 3 tablespoons vegetable oil — Canola or avocado oil work equally well. Avoid olive oil here — its smoke point is too low for the high oven temperature.
- 1 teaspoon kosher salt — Kosher salt dissolves evenly and clings to the wedges better than fine table salt.
- 1/2 teaspoon freshly ground black pepper — Freshly ground gives a brighter, more aromatic heat.
- 1 teaspoon garlic powder — Not garlic salt. Garlic powder provides deep savory flavor without extra sodium.
- 1 teaspoon onion powder — Adds a subtle sweetness that rounds out the spice blend.
- 1 teaspoon paprika — Use standard paprika, not smoked or hot, for that classic red hue and mild pepper flavor.
- 1/4 teaspoon cayenne pepper (optional) — Omit it if you prefer mild heat, or add an extra pinch if you want more kick.
For the Dip
- 1/2 cup full-fat sour cream — Full-fat is essential here; low-fat versions make the dip watery and thin.
- 2 tablespoons mayonnaise — Full-fat again. Mayo gives the dip body and a tangy richness.
- 1 tablespoon buttermilk — If you don’t have buttermilk, stir 1/2 teaspoon lemon juice into regular milk and let it sit for 5 minutes.
- 1/2 teaspoon dried dill — Dill is the signature herb in this style of ranch dip. Do not substitute fresh dill — it is too mild and will not hold up.
- 1/4 teaspoon garlic powder — Reinforces the garlic notes in the potato seasoning.
- 1/4 teaspoon onion powder — Balances the dip and ties it to the wedges.
- 1/4 teaspoon kosher salt — Adjust to taste after mixing.
- Fresh chives or parsley for garnish (optional) — A sprinkle of green adds color and a fresh finish.
Equipment Needed
- Rimmed baking sheet with a wire rack — The rack lifts the wedges off the pan so hot air circulates around every side, creating even crispness. If you do not have a rack, line the sheet with parchment paper instead.
- Large mixing bowl — Big enough to toss the wedges without spilling. A metal or glass bowl works best because it does not absorb odors.
- Clean kitchen towel or paper towels — Drying the soaked wedges thoroughly is non-negotiable for browning. A lint-free towel works best.
- Small bowl for the spice blend — Whisking the spices together before adding them ensures every wedge gets an even coating.
- Spatula or tongs — Flipping the wedges halfway through baking is easier with a thin metal spatula that slides under the crust without tearing it.
Instructions to Prepare Boston Pizza Cactus Cut Potatoes
Eight straightforward steps stand between you and a platter of crisp, seasoned wedges. Follow them in order and you will avoid the soggy pitfalls that plague most oven fries.
- Preheat and prep the pan — Set your oven to 425°F (218°C). Place a wire rack inside a rimmed baking sheet for maximum air circulation, or line the sheet with parchment if a rack is unavailable. A hot oven is crucial for creating that crispy exterior while keeping the interior fluffy.
- Soak the wedges — Put the cut wedges in a large bowl and cover them with cold water. Let them sit for 10 minutes. This step removes excess surface starch, which helps the wedges crisp up instead of sticking or steaming. Drain them thoroughly and pat them completely dry with a clean kitchen towel — any remaining moisture will prevent browning.
- Mix the seasoning — In a small bowl, combine the kosher salt, black pepper, garlic powder, onion powder, paprika, and cayenne. Whisk until evenly distributed. This blend is the signature savory-spicy profile of the original dish.
- Coat with oil — Return the dry wedges to the large bowl and drizzle with the vegetable oil. Toss with your hands or a spatula until each wedge is lightly and evenly coated. The oil helps the seasoning adhere and conducts heat for deep, even browning.
- Season thoroughly — Sprinkle the prepared spice mixture over the oiled wedges and toss again until every piece is well coated. Be thorough — any missed spots will be bland. The seasoning should cling to the oiled surface; if it falls off, you may have used too little oil.
- Arrange in a single layer — Place the wedges on the prepared baking sheet or wire rack with no overlapping. Overcrowding traps steam and leads to soggy potatoes. If necessary, use two sheets or bake in batches. Reserve any seasoning that fell onto the baking surface.
- Bake and flip — Bake for 20 minutes, then use a spatula to flip each wedge over. Flip carefully to keep the seasoning intact. Continue baking for another 15 to 20 minutes, or until the wedges are deep golden brown and crisp on the edges. A fork inserted into the thickest part should slide in with minimal resistance, indicating a fluffy interior.
- Make the dip — While the potatoes bake, combine the sour cream, mayonnaise, buttermilk, dried dill, garlic powder, onion powder, and kosher salt in a small bowl. Stir until smooth and evenly incorporated. Taste and adjust salt or dill as desired. For a thinner dip, add an extra teaspoon of buttermilk. Cover and refrigerate until serving — this allows the flavors to meld.
- Rest and serve — Remove the baked wedges from the oven and transfer them to a serving platter. If you have leftover seasoning from earlier, sprinkle it over the hot wedges for an extra punch. Let them rest for 1 to 2 minutes — this allows the crust to set so it does not become soggy from steam. Serve immediately with the chilled dip on the side. Garnish with fresh chives or parsley if desired. These are best enjoyed hot and crispy within 10 minutes of leaving the oven.

Expert Tips for a Standout Boston Pizza Cactus Cut Potatoes
- Dry the wedges like your life depends on it — Any moisture left on the surface turns to steam in the oven, which softens the exterior and prevents browning. After soaking, lay the wedges on a towel and pat them dry on all sides. Let them air-dry for a few extra minutes if you have time.
- Cut uniform wedges — Aim for 1/2-inch thickness on every wedge. Pieces that are thicker or thinner will cook at different rates, leaving you with some burnt and some underdone. A sharp chef’s knife and a steady hand make this easy.
- Do not skip the wire rack — A wire rack lifts the wedges off the baking sheet so hot air circulates underneath. Without it, the bottom of each wedge steams against the pan and turns soft. If you do not have a rack, flip the wedges at the 20-minute mark and rotate the pan to compensate.
- Reserve extra seasoning — Some of the spice blend always falls off during baking. Save it and sprinkle it over the hot wedges the moment they come out of the oven. The residual heat helps it stick and adds a final flavor punch.
- Let the dip sit — The ranch-style dip tastes noticeably better after 20 minutes in the fridge. The dried dill and garlic powder need time to rehydrate and meld with the sour cream. Make the dip before you cut the potatoes and let it chill while the oven preheats.
- Adjust the heat to your crowd — The 1/4 teaspoon of cayenne gives a mild warmth, not a burn. If you are serving kids or spice-sensitive guests, leave it out entirely. For extra heat, double the cayenne or serve the wedges with hot sauce on the side.
- Bake in the upper third of the oven — The top rack position gives more direct heat exposure, which promotes browning. If your oven has hot spots, rotate the baking sheet halfway through the first 20-minute bake.
Common Mistakes to Avoid
- Skipping the soak — Without the 10-minute cold water soak, excess starch stays on the surface. That starch turns gummy in the heat and prevents the wedges from crisping. The soak is not optional — it changes the texture completely.
- Overcrowding the pan — When wedges overlap or touch each other, they trap steam and soften instead of crisping. Leave a finger-width gap between each piece. Use two baking sheets if your oven can fit them side by side.
- Using the wrong oil — Olive oil burns at 425°F and leaves a bitter taste. Stick with vegetable, canola, or avocado oil, which have smoke points above 450°F. The oil should help the wedges brown, not scorch.
- Flipping too early — The wedges need the full 20 minutes before the first flip. If you try to turn them sooner, the crust has not formed yet and the seasoning will scrape off onto the pan. Let them set before moving them.
- Microwaving leftovers — The microwave turns these crisp wedges into rubbery, chewy disks. Always reheat them in the oven or an air fryer to restore the crunch. The 5-minute oven reheat is worth the wait.
- Forgetting to season the oil layer first — Sprinkling spices onto dry wedges without oil results in seasoning that falls off during baking. Always oil first, then season. The oil acts as glue for the spice blend.
Variations & Ways to Customize Boston Pizza Cactus Cut Potatoes
- Smoky chipotle version — Replace the paprika and cayenne with 1 teaspoon of chipotle powder and 1/2 teaspoon of smoked paprika. This gives the wedges a deep, smoky heat that pairs beautifully with a lime-cilantro crema.
- Parmesan-herb twist — After baking, toss the hot wedges with 2 tablespoons of grated Parmesan and 1 teaspoon of dried oregano. The cheese sticks to the seasoned crust and adds a savory, umami layer.
- Lemon-pepper variation — Omit the cayenne and add 1 teaspoon of lemon zest and 1/2 teaspoon of coarsely ground black pepper to the spice blend. Finish with a squeeze of fresh lemon juice before serving for brightness.
- Sweet potato swap — Substitute sweet potatoes for russets and reduce the bake time by 5 to 7 minutes. Sweet potatoes cook faster and have a softer interior, so watch them closely after the flip.
- Buffalo-style wedges — Toss the baked wedges in 2 tablespoons of melted butter mixed with 1 tablespoon of hot sauce. Serve with blue cheese dip instead of the ranch-style version for a classic buffalo pairing.
- Extra-crispy double-bake method — Bake the wedges for 20 minutes, flip them, then bake for another 10 minutes. Turn off the oven, leave the door slightly ajar, and let the wedges sit inside for 10 more minutes. The residual heat dries out the surface further for an even crunchier texture.
What to Serve With Boston Pizza Cactus Cut Potatoes
These wedges work as a starter, a side, or the centerpiece of a casual meal. The bold seasoning pairs well with proteins and bright sides that balance the richness.
- Grilled steak or burgers — The smoky, charred flavors of grilled beef stand up to the spicy seasoning. A simple green salad on the side rounds out the plate.
- Crispy chicken tenders — A classic pub-style duo. The creamy dip works for both the wedges and the chicken, so you only need one sauce.
- Roasted vegetables — Oven-roasted broccoli, bell peppers, or zucchini add color and a mild, sweet contrast to the spiced potatoes.
- Cold beer or iced tea — A crisp lager or an unsweetened iced tea cuts through the richness of the fried-style wedges and refreshes the palate between bites.
- Loaded nachos — Serve the wedges alongside a platter of nachos for a shareable appetizer spread. Both dishes benefit from the same toppings — cheese, jalapeños, salsa, and sour cream.
- Lemon-dressed slaw — A tangy, crunchy slaw made with cabbage, carrots, and a lemon vinaigrette provides acidity that balances the heat and fat in the wedges.
Make-Ahead Instructions
- Cut and soak the potatoes in advance — Slice the wedges, soak them for 10 minutes, then dry them thoroughly. Store the dry wedges in an airtight container in the fridge for up to 8 hours before baking. Do not oil or season them until right before they go into the oven.
- Prep the dip up to 3 days ahead — Mix the sour cream, mayonnaise, buttermilk, dill, garlic powder, onion powder, and salt. Cover and refrigerate. The dip actually improves after a day in the fridge as the dried herbs rehydrate and the flavors meld.
- Mix the spice blend and store it — Combine the salt, pepper, garlic powder, onion powder, paprika, and cayenne in a small jar or bag. Keep it at room temperature for up to 2 weeks. When you are ready to bake, just toss the dry wedges in oil and shake on the seasoning.
- Partially bake, then finish later — Bake the wedges for 15 minutes instead of the full 35. Let them cool completely, then refrigerate on the baking sheet for up to 24 hours. When ready to serve, bake at 425°F for 15 to 18 minutes until hot and crisp.
Storage and Reheating
Storage
- Airtight container in the fridge — Transfer leftover wedges to an airtight container and refrigerate for up to 3 days. Do not stack them more than two layers deep or the bottom wedges will soften from trapped moisture.
- Paper towel layer — Place a paper towel at the bottom of the container and another on top of the wedges before sealing. The paper absorbs condensation and helps the wedges stay firmer during storage.
- Keep the dip separate — Store the dip in its own container in the fridge for up to 5 days. Never pour the dip over leftover wedges before storing — they will become soggy within minutes.
- Freezing not recommended — The texture of the potatoes breaks down when frozen and thawed. The wedges become mealy and watery, and the crisp crust disappears. Only freeze if you plan to use them in soup or a casserole.
Reheating
- Oven method (best results) — Preheat the oven to 400°F (204°C). Spread the wedges in a single layer on a baking sheet. Warm for 5 to 7 minutes until the crust re-crisps and the interior is hot. Do not cover them with foil or the steam will soften the exterior.
- Air fryer method — Set the air fryer to 375°F (190°C). Place the wedges in the basket in a single layer and heat for 3 to 4 minutes. Shake the basket halfway through. This method is faster than the oven and produces a very similar crunch.
- Stovetop skillet method — Heat a dry nonstick or cast-iron skillet over medium heat. Add the wedges in a single layer and cook for 2 to 3 minutes per side. Press them gently with a spatula to maximize contact with the hot surface. This works well for small batches.
- Do not microwave — The microwave turns the wedges rubbery and chewy within 30 seconds. Even a short blast ruins the texture. If you are in a rush, use the air fryer or skillet instead.
Nutritional Breakdown (Per Serving)
Based on 1 serving = 1/4 of the total recipe (about 4 wedges plus dip).
- Calories: 375
- Protein: 6g
- Fat: 18g
- Saturated Fat: around 5g
- Carbohydrates: 44g
- Fiber: 4g
- Sugar: 2g
- Sodium: roughly 560mg
- Cholesterol: about 20mg
Frequently Asked Questions
Can I make Boston Pizza Cactus Cut Potatoes in an air fryer?
Yes. Reduce the oven temperature to 400°F (204°C) and cook the wedges in a single layer in the air fryer basket for 12 to 15 minutes, shaking the basket halfway through. Work in batches to avoid overcrowding. The result is very crisp with slightly less oil.
How long does Boston Pizza Cactus Cut Potatoes last in the fridge?
Store leftover wedges in an airtight container for up to 3 days. The dip keeps for up to 5 days in a separate container. Reheat the wedges in the oven or air fryer to restore the crisp texture — never use the microwave.
Can I freeze these wedges?
Freezing is not recommended. The potato texture breaks down upon thawing, turning the interior mealy and watery. The crust also loses all its crunch. Stick to refrigerating leftovers and reheating them in the oven within 3 days.
What type of potato works best for cactus cut wedges?
Russet potatoes are the best choice because of their high starch content and low moisture. They bake up fluffy on the inside and crisp on the outside. Yukon Golds work in a pinch but produce a denser, less fluffy interior.
Why are my wedges not getting crispy?
The most common reasons are leftover moisture after soaking, overcrowding on the baking sheet, or an oven temperature that is too low. Make sure the wedges are patted completely dry, leave space between each piece, and confirm your oven actually reaches 425°F with an oven thermometer.
Can I double the recipe?
Yes, but do not overcrowd the pan. Use two baking sheets placed on the upper and lower oven racks. Rotate the sheets and swap their positions halfway through the baking time to ensure even browning. You may need to add 3 to 5 minutes to the total bake time.
Final Words
These Boston Pizza Cactus Cut Potatoes deliver the same crave-worthy crunch and bold seasoning as the restaurant version, but you make them in your own kitchen with less oil and total control over the heat. The simple soak-and-bake method takes the guesswork out of crispy oven wedges, and the creamy ranch-style dip ties everything together. Give this recipe a try — it might just become your new go-to appetizer for game days, movie nights, or any night you want something deeply satisfying.
More Recipes
PrintBoston Pizza Cactus Cut Potatoes

Perfectly crispy on the outside, fluffy on the inside, these oven-baked cactus cut potatoes are seasoned with a spicy-savory blend and served with a creamy ranch-style dip. This copycat recipe delivers all the flavor of the restaurant favorite with less oil and a fraction of the effort.
- Prep Time: 20
- Cook Time: 35
- Total Time: 55
- Yield: 4 1x
- Category: Appetizer
- Method: Baking
- Cuisine: American
Ingredients
- 3 large russet potatoes (about 2.5 pounds), scrubbed and cut into 1/2-inch thick wedges
- 3 tablespoons vegetable oil (canola or avocado oil are also fine)
- 1 teaspoon kosher salt
- 1/2 teaspoon freshly ground black pepper
- 1 teaspoon garlic powder
- 1 teaspoon onion powder
- 1 teaspoon paprika
- 1/4 teaspoon cayenne pepper (optional for heat)
- For the dip:
- 1/2 cup full-fat sour cream
- 2 tablespoons mayonnaise (preferably full-fat)
- 1 tablespoon buttermilk (or milk + 1/2 teaspoon lemon juice)
- 1/2 teaspoon dried dill
- 1/4 teaspoon garlic powder
- 1/4 teaspoon onion powder
- 1/4 teaspoon kosher salt
- Fresh chives or parsley for garnish (optional)
Instructions
- Preheat the oven to 425°F (218°C). Place a wire rack inside a rimmed baking sheet for maximum air circulation, or line the sheet with parchment paper if a rack is unavailable. A hot oven is crucial for creating a crispy exterior while keeping the interior fluffy.
- Place the potato wedges in a large bowl and cover with cold water. Let them soak for 10 minutes. This step removes excess surface starch, which helps the wedges crisp up instead of sticking or steaming. Drain the wedges thoroughly and pat them completely dry with a clean kitchen towel—any remaining moisture will prevent browning.
- In a small bowl, combine the kosher salt, black pepper, garlic powder, onion powder, paprika, and cayenne. Whisk to evenly distribute the spices. This seasoning blend is the signature savory-spicy profile of the original dish.
- Return the dry potato wedges to the large bowl and drizzle with the vegetable oil. Toss with your hands or a spatula until each wedge is lightly and evenly coated. The oil helps the seasoning adhere and conducts heat for deep, even browning.
- Sprinkle the prepared spice mixture over the oiled wedges and toss again until every piece is well coated. Be thorough—any missed spots will be bland. The seasoning should cling to the oiled surface; if it falls off, you may have used too little oil.
- Arrange the wedges in a single layer on the prepared baking sheet or wire rack. Make sure none are overlapping; overcrowding traps steam and leads to soggy potatoes. If necessary, use two sheets or bake in batches. Reserve any leftover seasoning that fell onto the baking surface.
- Bake for 20 minutes, then use a spatula to flip each wedge over. Flip carefully to keep the seasoning intact. Continue baking for another 15 to 20 minutes, or until the wedges are deep golden brown and crisp on the edges. A fork inserted into the thickest part should slide in with minimal resistance, indicating a fluffy interior.
- While the potatoes bake, prepare the dip. In a small bowl, combine the sour cream, mayonnaise, buttermilk, dried dill, garlic powder, onion powder, and kosher salt. Stir until smooth and evenly incorporated. Taste and adjust salt or dill as desired. For a thinner dip, add an extra teaspoon of buttermilk. Cover and refrigerate until serving—this allows the flavors to meld.
- Remove the baked wedges from the oven and transfer them to a serving platter or plate. If you have leftover seasoning from earlier, sprinkle it over the hot wedges for an extra punch. Let them rest for 1 to 2 minutes—this allows the crust to set so it doesn’t become soggy from steam.
- Serve the cactus cut potatoes immediately, with the chilled dip on the side. Garnish with fresh chives or parsley if desired. The potatoes are best enjoyed hot and crispy within 10 minutes of leaving the oven.
Notes
Storage: Leftover potatoes can be kept in an airtight container in the refrigerator for up to 3 days. To reheat, spread them in a single layer on a baking sheet and warm in a 400°F (204°C) oven for 5 to 7 minutes until crisp. Do not microwave—it will make them rubbery. Freezing is not recommended as the texture breaks down upon thawing. The dip will keep for up to 5 days in the refrigerator.
Nutrition
- Calories: 375
- Sugar: 2g
- Sodium: 560mg
- Unsaturated Fat: 4g
- Carbohydrates: 44g
- Fiber: 4g
- Protein: 6g
- Cholesterol: 18mg
Keywords: Boston Pizza Cactus Cut Potatoes, cactus cut potatoes, baked potato wedges, spicy potato wedges, copycat recipe, appetizer, snack, easy potato recipe, oven roasted potatoes, ranch dip