Raising Cane’s Chicken Fingers (Gluten Free Version)
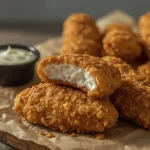
Crispy, juicy, and perfectly seasoned gluten-free chicken tenders that mimic the iconic Cane’s flavor. The buttermilk marinade ensures tender meat, while the gluten-free flour blend with cornstarch creates a crunchy, golden crust that stays crisp.
- Prep Time: 20
- Cook Time: 12
- Total Time: 32
- Yield: 4 1x
- Category: Main Course
- Method: Stovetop
- Cuisine: American
Ingredients
- 1 1/2 lb chicken breast tenders (about 8–10 tenders)
- 1 cup full-fat buttermilk
- 1 large egg
- 1 tsp kosher salt
- 1/2 tsp black pepper
- 1/2 tsp garlic powder
- 1/2 tsp onion powder
- 1/4 tsp paprika
- 1/4 tsp cayenne pepper (optional, for heat)
- 1 cup gluten-free all-purpose flour blend (with xanthan gum)
- 1/2 cup cornstarch
- 1 tsp baking powder
- 1 tsp kosher salt (for coating)
- 1/2 tsp black pepper (for coating)
- 1/2 tsp garlic powder (for coating)
- 1/2 tsp onion powder (for coating)
- 1/4 tsp paprika (for coating)
- 2 cups vegetable oil (for frying)
Instructions
- In a large bowl, whisk together the buttermilk, egg, 1 tsp kosher salt, 1/2 tsp black pepper, 1/2 tsp garlic powder, 1/2 tsp onion powder, 1/4 tsp paprika, and cayenne if using. Add the chicken tenders and toss to coat completely. Cover and refrigerate for at least 30 minutes or up to 4 hours to tenderize and infuse flavor.
- In a shallow dish or pie plate, combine the gluten-free flour, cornstarch, baking powder, 1 tsp kosher salt, 1/2 tsp black pepper, 1/2 tsp garlic powder, 1/2 tsp onion powder, and 1/4 tsp paprika. Whisk until well blended.
- Line a baking sheet with a wire rack for holding the coated tenders. Remove the chicken from the buttermilk mixture, letting any excess drip off. Working one at a time, dredge each tender in the flour mixture, pressing firmly to adhere. Shake off excess and place on the rack. Let the coated tenders rest for 10 minutes to allow the coating to set, ensuring better adhesion during frying.
- While the chicken rests, pour the vegetable oil into a large, heavy-bottomed skillet or Dutch oven to a depth of about 1/2 inch. Heat over medium-high heat until the oil shimmers and a small piece of bread sizzles immediately when dropped in (about 350°F / 175°C if using a thermometer).
- Carefully place 3-4 tenders into the hot oil in a single layer, ensuring not to overcrowd the pan. Fry for 3-4 minutes per side, turning once, until golden brown and crispy. The internal temperature should reach 165°F / 74°C. Use tongs to turn the chicken gently to avoid tearing the coating.
- Transfer the fried tenders to a clean wire rack set over a baking sheet to drain excess oil. Repeat with the remaining tenders, allowing the oil to return to temperature between batches.
- If you prefer an oven method, preheat oven to 400°F / 204°C. Place the coated tenders on a baking sheet lined with a wire rack and brush or spray lightly with oil. Bake for 20-25 minutes, flipping halfway, until internal temperature reaches 165°F / 74°C and coating is crisp. Increase broil for the last 2 minutes for extra crunch.
- Serve immediately with your favorite dipping sauce (classic Cane’s sauce is a mix of ketchup, mayonnaise, garlic powder, and Worcestershire sauce, but ensure the Worcestershire sauce is gluten-free).
Notes
Storage: Refrigerate leftover chicken fingers in an airtight container for up to 3 days. Freeze: Place cooled tenders in a single layer on a baking sheet and freeze until solid, then transfer to a freezer bag for up to 3 months. Reheat: For best crispiness, reheat in an air fryer at 375°F / 190°C for 4-6 minutes, or in a preheated oven at 400°F / 204°C for 8-10 minutes. Avoid microwave as it will make the coating soggy.
Nutrition
- Calories: 485
- Sugar: 2g
- Sodium: 840mg
- Unsaturated Fat: 4g
- Carbohydrates: 35g
- Fiber: 2g
- Protein: 34g
- Cholesterol: 115mg
Keywords: gluten free chicken fingers, Cane's copycat, crispy chicken tenders, buttermilk fried chicken, gluten free fried chicken, chicken fingers recipe, kid friendly dinner, quick dinner, comfort food